Domains & SSL
Connect your custom domains to Kuploy and secure them with automatic SSL certificates.
Domain Limits by Plan
Each plan includes a specific number of domains: see platform plans.
| Plan | Custom Domains | Free Subdomains |
|---|---|---|
| Hobby | 0 | 1 |
| Starter | 3 | 2 |
| Growth | 10 | 5 |
| Business | 50 | 10 |
| Enterprise | Unlimited | Unlimited |
On eligible plans (typically Pro and above), or on instances with an Enterprise license, you can also search for and purchase domains directly from the platform. Purchased domains come pre-configured with DNS records pointing to your server. Access is determined by a license-first, plan-fallback check — if your platform operator has an Enterprise license with domain purchase enabled, all users can purchase domains regardless of their individual plan.
Custom domains, free Kuploy subdomains, and purchased domains count separately toward your limits.
Purchasable Domains by Plan
| Plan | Purchasable Domains |
|---|---|
| Free | 0 |
| Pro | 3 |
| Business | 10 |
The exact plans and limits depend on your platform operator's configuration. Check your billing page for current limits.
Free Kuploy Subdomains
Every application automatically receives a free Kuploy subdomain:
https://[your-app-name].kuploy.app
Requesting a Subdomain
- Navigate to your application
- Go to the Domains tab
- Click Add Kuploy Subdomain
- Choose your subdomain name (e.g.,
myappformyapp.kuploy.app) - Click Create
Features:
- ✅ Automatic SSL certificate
- ✅ Instant DNS provisioning (no waiting)
- ✅ No DNS configuration required
- ✅ Always available on all plans
Free subdomains are perfect for:
- Development and staging environments
- Personal projects
- Quick demos and prototypes
Purchasing a Domain
If your plan includes domain purchasing, you can buy and manage domains directly from the platform.
Searching for Domains
You can search for available domains in two places:
- Landing page — The hero section includes a domain search bar (no sign-in required)
- My Domains page (
/domains) — Full search and management interface
Enter a domain name (e.g., mycompany) and the system checks availability across common TLDs (.com, .net, .org, .io, .dev).
Buying a Domain
- Search for a domain on the landing page or at
/domains - Click Buy on an available domain
- You'll be taken to the checkout page (
/domains/checkout) - Select a registration duration (1, 2, 3, or 5 years)
- Confirm the purchase
After purchase:
- DNS A records are automatically configured to point to your server
- A www CNAME record is set up for the domain
- The domain appears in your My Domains list
- You can immediately assign it to an application
Managing Purchased Domains
Navigate to /domains to see all your purchased domains. For each domain you can:
- View status — Active/inactive, auto-renewal, and expiry date
- Manage DNS — Click DNS to add, edit, or remove DNS records
- Create a project — Quick link to create a project using the domain
Saving DNS records replaces all existing records at the registrar. Make sure to include all records you want to keep.
Domain Purchase Access
Domain purchasing is controlled by a license-first, plan-fallback check:
- If your platform operator has an Enterprise license with
domainPurchaseenabled, all users can purchase domains regardless of individual plan - Otherwise, your subscription plan must have
domainPurchase: true(typically Pro or Business)
If neither condition is met, the /domains page shows an Upgrade Required prompt.
Domain Purchase Limits
Domain purchases count against your plan's purchasable domain limit. If you've reached your limit, you'll need to upgrade your plan. Check your billing page for current limits.
Renewing a Domain
Your Domains page lists every custom domain attached to an app in your organization and when each one expires, with a badge for how long is left and another for domains held at a registrar outside the platform.

Domains are registered for the term you chose, and nothing is ever charged automatically — no card or wallet is kept on file for renewals, so a renewal is a one-off payment you make yourself.
How a renewal travels:
Renewals you make at the registrar instead skip steps 1–3, and the console catches up on its daily refresh.
The Renewals due card
As a domain nears expiry, a Renewals due card appears at the top of your
Domains page (in the sidebar under Home, or at /domains). It stays
hidden while nothing is due, so most of the time you won't see it. It lists every domain in your organization at or near expiry — whether
you bought it here or brought it with you — with:
- the domain name and how long is left (
14d left, orexpired 3d agoonce the date has passed — a lapsed domain stays on the list rather than disappearing) - the expiry date and the registrar holding it
How early the card appears is set by your platform operator (out of the box, the first warning lands 45 days before expiry).
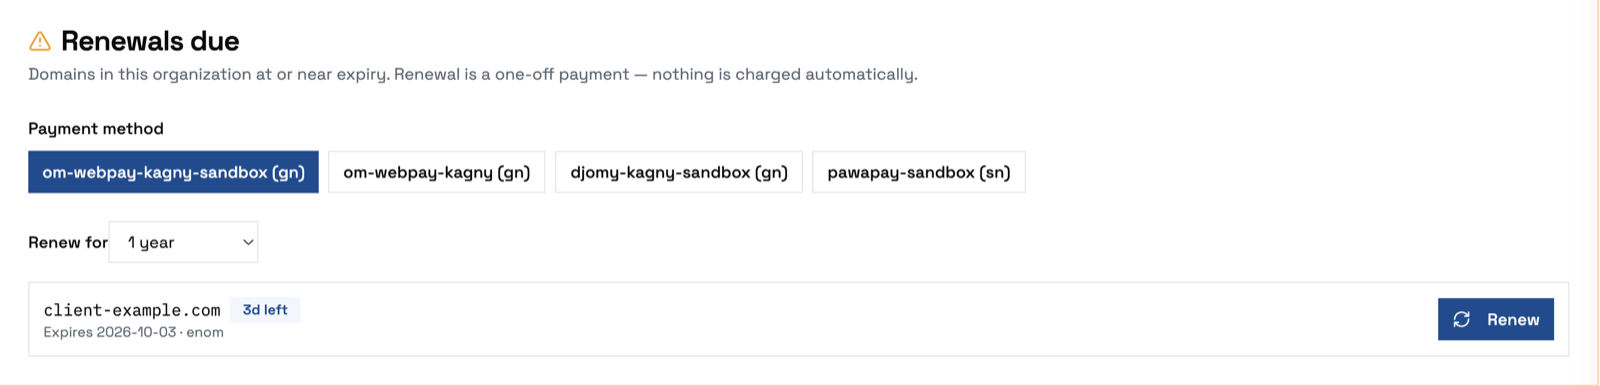
Renewing
- Open Domains from the sidebar.
- In Renewals due, pick a Payment method — the same providers you use for any other payment on the platform.
- Choose how long to Renew for — 1 to 5 years.
- Click Renew on the domain. You're taken to the payment page.
Once the payment clears, the domain is extended at the registrar. If you don't renew, the domain lapses at its expiry date.
How to tell it worked: check the expiry date on the domain. When you renew here, the platform reads the new date back from the registrar and stores it straight away, so the date moves and the domain drops off the card. If you renewed directly with your registrar instead, the console can take up to a day to catch up — it refreshes expiry dates once daily.
If the date still hasn't moved a day later, contact your platform administrator rather than paying again; they can check the registrar's own record.
The card is deliberately not gated on the domain-purchase feature. If your
organization moves to a plan without domain purchasing, /domains shows the
upgrade prompt — but the domains you already own still appear here and can still
be renewed.
A domain may show auto-renewal in its status. That is a registrar setting your platform operator controls, not a tenant option — it charges the platform's own registrar account, so operators enable it only for domains they choose to front. Unless you've been told otherwise, assume your domain will not auto-renew and renew it yourself.
Domains you registered elsewhere
A domain held at a registrar your platform has no account with shows Registered elsewhere — renew with your registrar instead of a button. The platform can see the expiry date and warn you about it, but it can't renew the domain on your behalf — renew it in your own registrar's control panel.
If you see No payment methods are available, no payment provider is configured on the platform yet; contact your platform administrator.
Renewal reminders
Ahead of expiry, the organization owner is emailed a reminder pointing at the Domains page. The reminder repeats as the deadline gets closer, each threshold firing once. To send the same reminder somewhere else — Slack, a shared inbox — enable the Domain Renewal Due event on a notification channel under Account → Billing → Notification Channels.
Default Domain
Applications also receive an auto-generated domain as a fallback:
https://[app-name]-[random-id].kuploy.app
This domain is always available and includes automatic SSL.
Adding Custom Domains
Custom domains require a Starter plan or higher. On the Hobby plan, you'll see an error when attempting to add a custom domain. Upgrade your plan to enable custom domains.
- Navigate to your application
- Go to the Domains tab
- Click Add Domain
- Enter your domain (e.g.,
app.yourdomain.com) - Click Add
DNS Configuration
After adding a domain, configure your DNS provider:
Subdomain (Recommended)
For subdomains like app.yourdomain.com or www.yourdomain.com:
| Type | Name | Value |
|---|---|---|
| CNAME | app | cname.kuploy.app |
# Example DNS record
app.yourdomain.com.  CNAME  cname.kuploy.app.
CNAME records are recommended because they automatically handle IP address changes.
Root Domain (Apex)
For root domains like yourdomain.com:
| Type | Name | Value |
|---|---|---|
| A | @ | 76.76.21.21 |
# Example DNS record
yourdomain.com.  A  76.76.21.21
Some DNS providers support CNAME flattening or ALIAS records for root domains. If available, use:
yourdomain.com. ALIAS cname.kuploy.app.
This is more reliable than A records.
www Redirect
To redirect www.yourdomain.com to yourdomain.com (or vice versa):
- Add both domains to your application
- Configure DNS for both:
yourdomain.com.      A      76.76.21.21
www.yourdomain.com. CNAME cname.kuploy.app. - In domain settings, set your preferred domain as primary
- Enable Redirect to Primary for the other domain
Automatic Let's Encrypt SSL
Kuploy automatically provisions free SSL certificates from Let's Encrypt:
- Automatic Provisioning - Certificates are issued within minutes of DNS verification
- Auto-Renewal - Certificates are renewed automatically before expiration
- No Configuration - Works out of the box with no setup required
SSL Status
Check your certificate status in the Domains tab:
| Status | Description |
|---|---|
| 🟢 Active | Certificate is valid and active |
| 🟡 Pending | Waiting for DNS verification |
| 🔴 Failed | Certificate provisioning failed |
Troubleshooting SSL Issues
If your certificate isn't provisioning:
- Verify DNS propagation - Use dnschecker.org to confirm your records are live
- Wait for propagation - DNS changes can take up to 48 hours (usually minutes)
- Check CAA records - Ensure CAA records allow Let's Encrypt:
yourdomain.com. CAA 0 issue "letsencrypt.org" - Remove conflicting records - Ensure no conflicting A/AAAA/CNAME records exist
Custom SSL Certificates
For specific requirements (EV certificates, wildcard domains, etc.), upload your own certificate:
- Go to Domains → select your domain
- Click Custom Certificate
- Upload your files:
- Certificate (
.crtor.pem) - Private Key (
.key) - CA Bundle (optional, for intermediate certificates)
- Certificate (
- Click Save
# Required files
certificate.crt    # Your SSL certificate
private.key        # Private key (keep this secret!)
ca-bundle.crt      # Intermediate certificates (if applicable)
Custom certificates are not auto-renewed. Set a reminder to update them before expiration.
Wildcard Domains
To use wildcard certificates (e.g., *.yourdomain.com):
- Upload a wildcard certificate as a custom certificate
- Add specific subdomains as needed
- They'll automatically use the wildcard certificate
Force HTTPS
All traffic is automatically redirected to HTTPS. This cannot be disabled for security reasons.
Kuploy adds the following security headers:
Strict-Transport-Security: max-age=31536000; includeSubDomains
Multiple Domains
You can add multiple domains to a single application:
app.yourdomain.com
www.yourdomain.com
yourdomain.com
app.anotherdomain.com
All domains serve the same application content.
Domain Verification
For certain TLD or domain registrars, additional verification may be required:
- Add a TXT record to verify ownership:
_kuploy-verify.yourdomain.com. TXT "verification-code-here" - Wait for verification to complete
- The domain becomes active
Best Practices
- Use subdomains - CNAME records are more reliable than A records
- Set up www redirect - Ensure users can access both
wwwand non-www - Monitor expiration - For custom certificates, track renewal dates
- Use CAA records - Restrict which CAs can issue certificates for your domain
- Test thoroughly - Verify SSL works on all target browsers and devices
DNS Provider Guide: Namecheap
Step-by-step instructions for configuring DNS in Namecheap.
- Log into namecheap.com
- Go to Domain List in the left sidebar
- Click Manage next to your domain
- Click the Advanced DNS tab
- Scroll to Host Records and click Add New Record
- For a subdomain (e.g.,
app.yourdomain.com):- Type: CNAME
- Host:
app(just the subdomain part) - Value:
cname.kuploy.app - TTL: Automatic
- Click the green checkmark to save
- Wait 5-30 minutes for propagation
For root domain (yourdomain.com):
- Type: A Record
- Host:
@ - Value:
76.76.21.21 - TTL: Automatic
Verifying DNS Propagation
After adding records, verify they're working:
- Use dnschecker.org to check global propagation
- Or run from terminal:
# Check CNAME
dig app.yourdomain.com CNAME

# Check A record
dig yourdomain.com A - Once propagated, return to Kuploy and verify the domain shows as active